Bridge WalkingPads into Home Assistant via Bluetooth and MQTT with a ESP32

Homebrain PaceKeeper

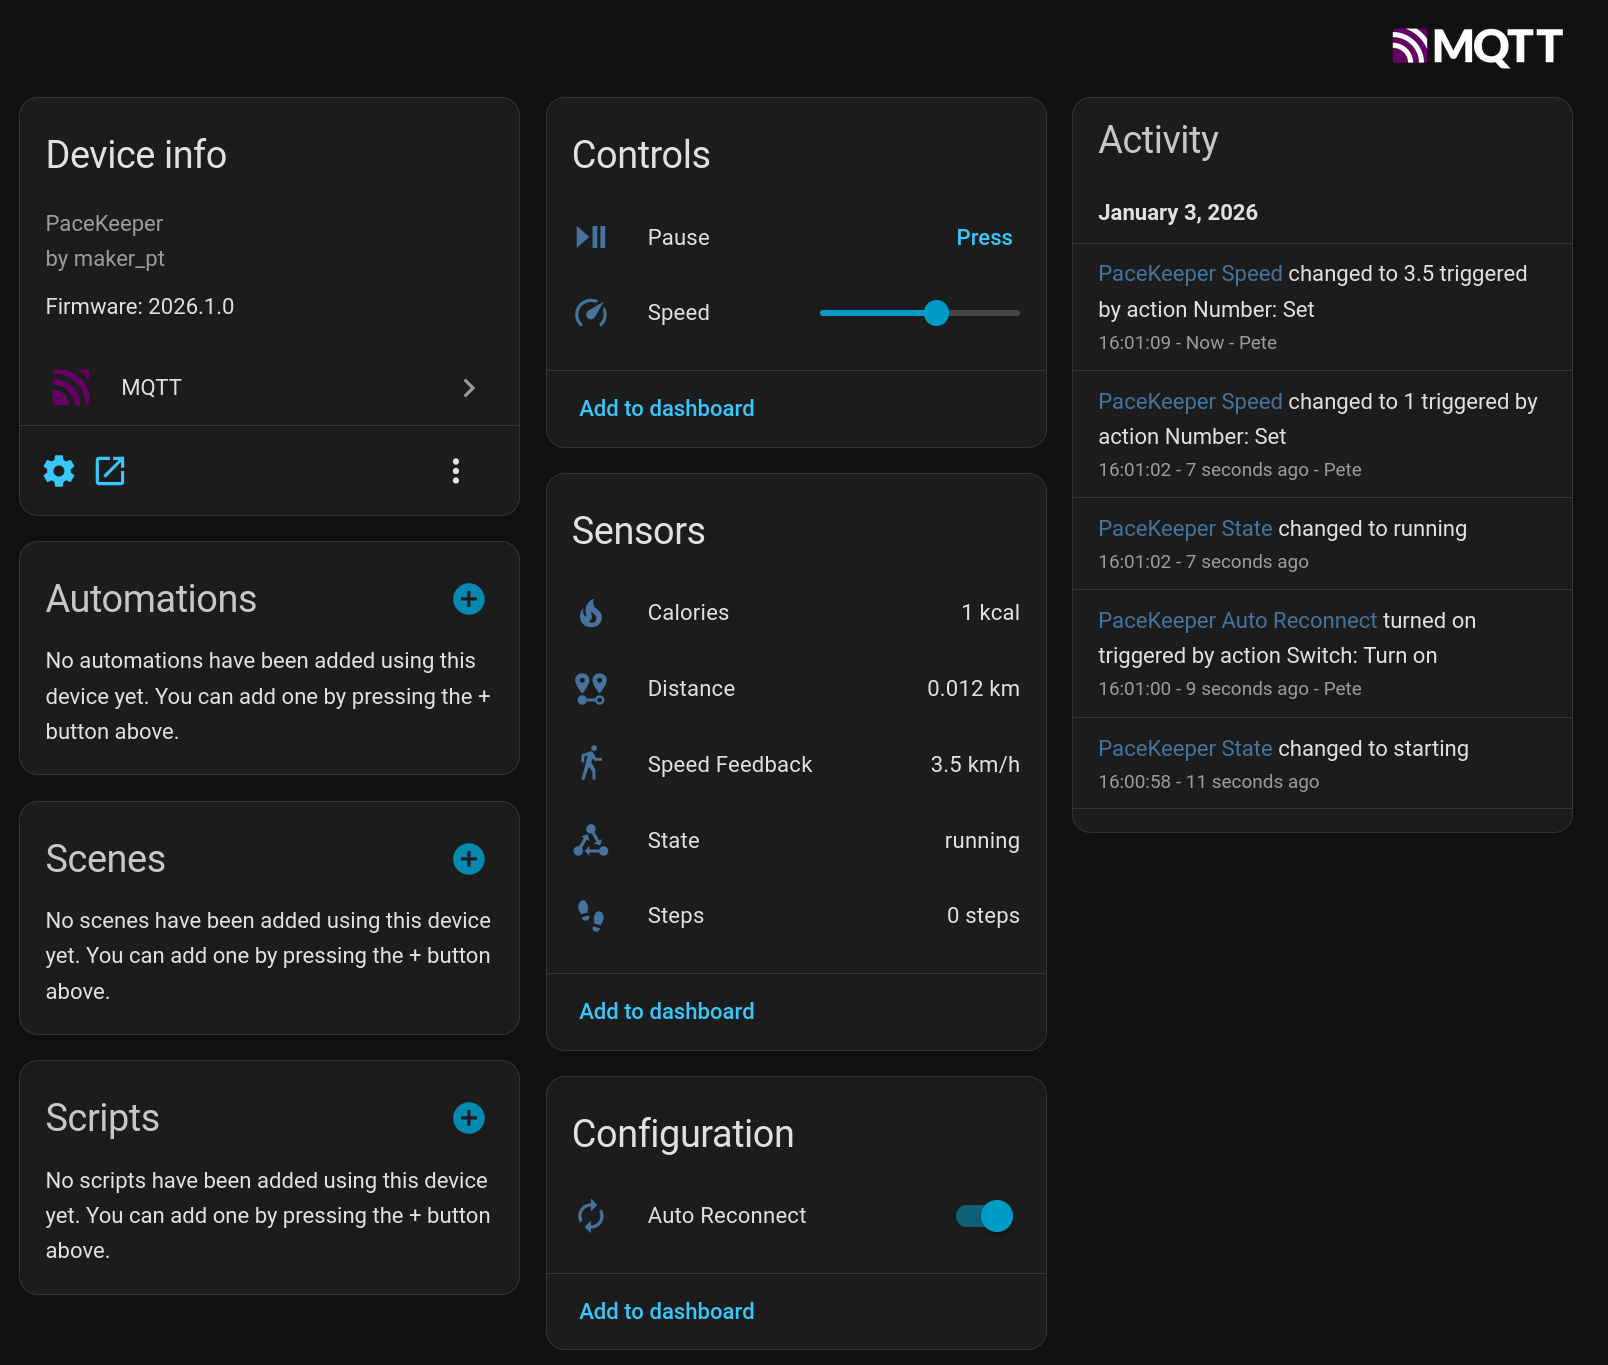
PaceKeeper is an ESP32 bridge that connects via Bluetooth to your WalkingPad and exposes the device via MQTT to Home Assistant.

Home Assistant PaceKeeper Device

Supported Hardware

  • PitPat-T01 Treadmill – Superun BA06-B1 [AliExpress]

Required Tools

  • ESP32 – I’m using a Wemos S3 Mini, but any ESP32 with Bluetooth should do [AliExpress] [Amazon]
  • VS Code with PlatformIO

Setup

Find the Bluetooth Address of the Device

Get an app like nRF Connect – this app allows you to view Bluetooth connections on your phone.

  • Turn the device on with the power switch
  • Either use the app to initialize the device or follow the steps in the section “Cloud Free Usage”
  • Open nRF Connect on your phone
  • The device should show up as PitPat-T01
  • Write down the Bluetooth address (it should look like AA:BB:CC:11:22)

Preparation of Home Assistant for MQTT

Project Compilation

  • Set up VS Code with PlatformIO
    (https://docs.platformio.org/en/latest/integration/ide/vscode.html#installation)
  • Clone this repo and open it in VS Code
  • Rename config.h.sample to config.h
  • Open the file and set the configuration values for MQTT and the Bluetooth address from the previous step
  • Connect the ESP32 with a USB cable (you might have to hold RST and BOOT while plugging it in)
  • Compile and flash the project via PlatformIO → Upload and Monitor
  • If everything goes well, you should see a bunch of log messages, and a new device called PaceKeeper should show up in your Home Assistant

Cloud Free Usage – Start Without WiFi, App, and Cloud Account

You’ll get a remote with it; it has +, , and play/pause buttons. However, when you turn it on, it initially reacts with a long, annoying sound to any button press. When you turn it on with the power button, it will also take a while before showing display information, first lighting up all display segments.

That’s where you strike.

Turn it on and quickly press (+); you will be greeted with a short sound. Then press −, −, −, +, +, wait 20 seconds, turn it off and on again. It should now display something else, and you can start using it.

Sequence

  • Turn on using the power switch on the device
  • Press - on the remote
  • Press + on the remote
  • Press + on the remote for 3 seconds

Each correct input will be confirmed by a short, happy sound. Each incorrect input will be confirmed by a long, annoying sound.

Source:
https://www.reddit.com/r/treadmills/comments/1jtuwix/heres_how_you_unlock_superun_treadmills_without/

GitHub Project Link

https://github.com/peteh/pacekeeper

Acknowledgements

I built this with the help of many other people who put effort into reverse-engineering the Bluetooth protocol.

Web Bluetooth App (Python)

Python web interface to control the treadmill via Bluetooth but for another model.

GitHub project:
https://github.com/azmke/pitpat-treadmill-control

Web Bluetooth App (JavaScript)

A Web Bluetooth app written in JavaScript. Fully supports the B1 as well.

GitHub project:
https://github.com/KeiranY/PitPat-WebBT/

Zwift Integration by qdomyos

There is some work in a B1 sub-branch.

Source file:
https://github.com/cagnulein/qdomyos-zwift/blob/master/src/devices/deeruntreadmill/deerruntreadmill.cpp

Further Notes

Deerrun and Superun seem to use the same OEM hardware, so it’s likely that those devices might work as well.

8 Years of Voice Journey

So this is a short article about my journey with voice control over the past 8 years. It’s just a summary of how voice improved over the last few years in general. Maybe some people might find it an interesting read.

I started relatively early with voice around 2017. My goal was to turn off light switches via voice, since my bed was far away from the light switch. I am often driven by laziness. Sometimes you have to get up from the couch to stay on the couch…

CMU Sphinx

The first setup was CMU sphinx on a pi with a cheap Logitech webcam as a mic combined with some cpp magic to send 433Mhz signals. There were wall switches with 433Mhz signals that you could control from these cheap remotes.

It did not work well and I had to scream a bit but sometimes it was switching the lights.

SNIPS.ai

A bit later, around 2018, Snips.ai came along and worked surprisingly well – the mqtt hermes protocol was easy enough to hook in a bunch of intents that I wrote in python to tell jokes and switch my 433 Mhz controller for the lights.

“Hey Snips, tell a joke…”. The joke was that Snips was bought by Sonos and I experienced the cloud lock-in for the first time. While you could run Snips fully offline, the training had to run in their cloud. Sonos did not take long to take down the Snips Cloud Training – so my setup became unchangeable and I could not add new intents. I kept it alive and hoped to find a replacement.

In 2019 I found a project called Rhasspy 2.4 that essentially was a drop-in replacement for Snips as it followed its Hermes mqtt protocol. It’s also the first time I learned about @synesthesiam . He is the mastermind behind Rhasspy.
I think it took not long until I got it running and all my intents and light control was working again. I could finally add new intents again as well. So far I still implemented everything that was controllable via direct listening on mqtt for parsed intents. On the hardware side, I was still limited to switching lights and outlets via 433Mhz from the Pi.

Homeassistant and Node-RED

In 2020 I found the homeassistant project that allowed to build a kind of hardware abstraction layer. With all these integrations, I started buying more appliances, threw out the 433Mhz devices to replace it with Shellys and essentially got my hands on a lot of other fun things.
Homeassistant did not have voice support yet though. Rhasspy somehow was available as an addon but I was running homeassistant via docker, so that was painful to get working together while not running directly on Home Assistant OS (HAOS).

I managed to write a lot of glue code in Node-RED to bridge Rhasspy into Homeassistant. Node-RED was collecting all entities, filtered them and used Rhasspy’s api endpoints for training to make Rhasspy aware of them. I even built some magic to be area aware. If the satellite was in the “living room” and there was a “living room light” entity, it was enough to say “turn on the light” to only turn on the living room light. As Rhasspy also provided a lot of other api endpoints I also added Signal Messenger. I could write intents directly via chat or send a voice message that would be handled via Rhasspy for intent handling. My glue code Node-RED-Signal-Rhasspy-Homeassistant bridge would then handle it and call the right services in Homeassistant.

My Rhasspy Glue Code Magic:

Handling Messages from and to Signal Messenger:

Integration of Signal with Rhasspy/Hermes

Year of the Voice

In 2023 Homeassistant announced the year of the voice. That’s also when I learned that @synesthesiam — the same person behind Rhasspy, which I had been using for 4 years — was involved. I had an Atom echo to try – but this thing was just useless to get anything going properly. Also wyoming satellite together with whisper was very far from usable and my Rhasspy setup was still way better in understanding the commands and executing them. However, I read every blog post about new voice features and got my hands on an esp32 box 3 – which was really challenging back then. It was definitely better than the atom echo and integrated better than my messy wyoming satellite setup but still – not on par with my Rhasspy setup.

Speech-to-Phrase

Fast forward to early 2025. @synesthesiam released speech-to-phrase. It was a bit hard to set up as docs were a bit confusing for running it in docker but I managed. This finally had detection rates similar to my rhasspy setup. Then I also got my hands on a few Voice PE which had some issues in the beginning but now are working reliably. Over the past few months, I migrated most of my intents from Node-RED to Homeassistant directly.

Getting Signal Messenger running again

I still wanted to use Signal Messenger to send voice commands to open the door while waiting outside. As I wanted to get away from my Node Red glue code magic, I rewrote my Signal bot which now directly talks to the Homeassistant assist web api endpoints.

So now, a bit less than two years after the “Year of the Voice” announcement, it finally feels like the Year of the Voice for me…

I want to thank the whole Homeassistant team, especially @synesthesiam for working on this and bringing local control, so I never have to care about another cloud going down…

Next step is fully local LLMs that do what we want.

So the last thing to do for now…

pete@homeassistant:~/Programming/docker/rhasspy$ docker compose down
[+] Running 2/2
 ✔ Container rhasspy        Removed                                                                                                                                                                                                                                                                                                                                                                                                                                                    0.2s 
 ✔ Network rhasspy_default  Removed                                                                                                                                                                                                                                                                                                                                                                                                                                                    0.2s